NBN™ Support FAQs
What is Central Coast Internet nbn™?
Central Coast Internet nbn™ is a broadband service delivered to you over nbn™, Australia’s new fibre network, using a variety of different broadband technologies provided by nbn™ Co. There are currently four ways Central Coast Internet can connect customers to the nbn™ network:
- nbn™ network over Fibre to the Premise (also known as FTTP): NBN Co runs fibre directly to a customer’s home. NBN Co needs to install an nbn™ utility box (outside your home) and an nbn™ connection box (inside your home) to allow you to connect to the nbn network. On sign up we will determine if you need an appointment.
- nbn™ network over Fibre to the Basement/Building (also known as FTTB): Fibre is run to a multi dwelling unit (typically an apartment building), with existing internal copper wiring within the building used to connect a VDSL service (Very-High-Bit-Rate DSL). Customers connect via their modem to the existing telecommunications socket. If you have an existing service on the line you will experience downtime until we get you connected.
- nbn™ network over Fibre to the Node (also known as FTTN): Fibre optic cables are run from the telephone exchange to a street node or pillar, then the existing telecommunications copper lines are used to deliver broadband to the home. Customers connect via their modem to the existing telecommunications socket. If you have an existing service on the line, you will experience downtime until we get you connected.
- nbn™ network over HFC (also known as Hybrid Fibre Coaxial): nbn co uses the existing HFC networks (e.g. cable internet and Pay TV). Depending on your situation, nbn co may need to install an nbn™ utility box outside your house. nbn co will install an nbn™ connection box inside your house near a HFC wall-plate/socket. On sign up, you will need an appointment.
What do I need to consider before signing up for Central Coast Internet nbn™ FTTB/FTTP/HFC?
Fibre to the Basement/Building (Central Coast Internet nbn™ FTTB)
If NBN Co are re-using the existing wiring in your building, an nbn™ installer will need to connect the wiring to the nbn™ node in your building. You will need to work with your building manager to ensure the installer has access to the communications room where the node has been installed. Once your line is connected to the nbn node, the nbn installer will need access to your place to test the line so you need to make sure you are home.
If you have an existing service on your line (e.g. phone, fax or internet), access to that service will be lost during the connection of your Central Coast Internet service so you may experience downtime while we complete your order. Your existing provider will be notified by NBN Co when your phone line is disconnected. Once your landline phone service is lost, you won’t be able to make calls or port your telephone number. We suggest you use a mobile phone to make voice calls in the interim.
Fibre to the Premise (Central Coast Internet nbn™ FTTP)
If you already have your nbn™ connection box installed then you should think about the following before signing up:
- Do I have enough free space for my modem near my nbn™ connection box?
- Do I have a free power point for my modem near my nbn™ connection box?
- Do I want my modem to be installed where my nbn™ connection box is?
If you answered ‘no’ to any of the above, whether you choose Central Coast Internet or any other service provider, you will need to engage an electrician to re-wire the connection between your nbn™ connection box and your modem. This will allow you to connect your modem to the nbn™ connection box, and position your modem where you want it to be.
If you already have an nbn™ utility box installed, but don't yet have an nbn™ connection box installed then you can proceed with ordering your Central Coast Internet service; we’ll work with NBN Co to organise an appointment for an nbn™ installer to come to your home to install an nbn™ connection box.
Prior to your NBN Co appointment, you should have a think about where you would like your nbn™ connection box installed. Some of the things you should consider when selecting a location:
- Ensure there’s a free power point within 3 metres of where the nbn™ connection box will be installed
- Ensure the nbn™ connection box is installed as close as possible to where the modem will be located in your home
- Ensure you’ve considered the light that the nbn™ connection box emits e.g. it may not be a good idea to install it in a bedroom
- Ensure the nbn™ connection box is not installed outside your property, in the garage, in a wet area or in a hard to reach location.
Note: A standard nbn™ installation only allows for 40 metres of fibre optic cable connecting the nbn™ utility box (located outside your home) to your nbn™ connection box (located inside your home).
HFC (Hybrid Fibre Coaxial)
NBN Co is using existing HFC networks (e.g. cable internet and pay TV) to connect customers to the nbn™ network. Depending on your situation, you may need nbn™ equipment outside your house, but nbn™ Co will use any existing HFC infrastructure previously installed. An nbn™ installer will need to install an nbn™ connection box inside your house near an HFC wall-plate/socket.
Please ensure you have enough power points near your HFC wall-plate/socket to power both the nbn™ connection box and Central Coast Internet modem, as well as any existing cable services (e.g. pay TV) that you want to keep.
If you have an existing cable service (e.g. internet or pay TV), access to this service will be lost during the installation of the nbn™ equipment and activation of your service. During the installation process, NBN Co will install an HFC radio frequency splitter to allow your existing services to work after the installation is complete. It is NBN Co’s responsibility to make sure your existing services still work after installation, so please get in contact with the nbn™ installer or with NBN Co if you have any issues.
If you no longer require any of your existing services after your Central Coast Internet service on the nbn network is activated, please contact your current provider to disconnect that service.
What information do I need to sign up to Central Coast Internet nbn™?
Check your address to find out if the nbn™ network is available at your address. Then to sign up, we'll need the following:
- Service address (where the Central Coast Internet nbn™ service will be connected)
- Full name
- Date of birth
- Email address
- Mobile number or other contact number
- Driver's licence, or other identification details
- Modem delivery address (if different to your service address)
- Credit or debit card details
I’m renting, what do I have to do to get connected to nbn™?
You need to get the property owner’s permission to install an nbn™ Connection Box at the property before you can be connected to the nbn™ service. We recommend you speak to your property manager or land lord to discuss the connection.
I live in an apartment block. Will I have access to the nbn™?
You sure will. But make sure that your Body Corporate has registered to be upgraded to the nbn™ so the design work can be completed.
Do I need a phone line to get Central Coast Internet nbn™?
No, you don’t need a phone line to get connected to Central Coast Internet nbn™.
Do I need to be there during the NBN Co installation?
Either you or somebody else over the age of 18 who is authorised to act on your behalf has to be home for the duration of the installation appointment. You will need to be there to let the NBN Co technician in, tell them where you’d like your nbn™ connection box installed, and at the completion of the installation sign a form confirming you’re happy with the location of your installed nbn™ connection box.
Can I keep my existing telephone number to use on the nbn™?
Yes, in most cases we can port your existing telephone number over to the nbn™.
To be sure you keep your phone number, specify that you’d like to keep your existing telephone number when you sign up online.
Alternatively, call our friendly Sales Team on 1300 746 754 to discuss the matter further.
Can I sign up for a service before I move in to a new place?
When will the nbn™ network be available in my area?
The nbn™ network is currently being rolled out region-by-region. nbn co anticipate the rollout of the network will take until 2020 to complete.
We have a handy nbn™ coverage map where you can check to see if construction has commenced in your location. Unfortunately we can't provide any timetables if the nbn™ roll-out hasn't started in your area yet. Information in the roll-out map is updated regularly, so keep checking!
You may wish to join our nbn™ Wait List so we’ll let you know how the rollout is progressing and when it will become live in your area.
I already have nbn™. How do I switch my nbn™ provider to Central Coast Internet?
If you already have an active nbn™ FTTP, FTTN, FTTB or Fixed Wireless service connected at your address and you'd like to switch to an Central Coast Internet nbn™ plan, please call us on 1300 746 754 between 9AM-5PM (AEST), Monday to Friday, to arrange a Service Transfer. Once lodged, Service Transfers typically take less than 2 business days to complete, and downtime is typically less than 24 hours.
Why do I need an NBN Co installation appointment?
To set you up with Central Coast Internet on the nbn™ you will need to live in an nbn™-ready area. The installation appointment will be required for a NBN Co technician to install an nbn™ connection box inside your home. This is the piece of equipment to which your Central Coast Internet modem will be connected.
Once NBN Co completes the installation of the nbn™ connection box, we can then get your Central Coast Internet service activated. Typically between 2-7 business days following the NBN Co installation, we’ll send you an SMS confirming your service is ready to use.
Note regardless of which service provider you choose for your nbn™ service, you will still need an appointment with NBN Co to install an nbn™ connection box (if you don’t already have one installed), prior to setting up your nbn™ service.
How do I prepare for my FTTB/FTTN appointment?
We will arrange for nbn™ to install your service. We’ve sent you an SMS about being present onsite on the day, so please refer to it for more information.
If you need to be present for your technician’s appointment, please ensure you are there or arrange someone over the age of 18 who can act on your behalf.
To get you connected, the technician will need access to your building’s communications room. You will need to organise this with your building manager.
Do I need to be there during the nbn™ Co installation?
Either you or somebody else over the age of 18 who is authorised to act on your behalf has to be home for the duration of the installation appointment. You will need to be there to let the NBN Co technician in, tell them where you’d like your nbn™ Connection Box installed, and at the completion of the installation sign a form confirming you’re happy with the location of your installed nbn™ connection box.
What do I need to know before my NBN Co installation appointment date?
Prior to your NBN Co appointment, you should have a think about where you would like your nbn™ connection box installed. Some of the things you should consider when selecting a location include:
- Ensure there is a free power point within 3 metres of where the nbn™ connection box will be installed
- Ensure the nbn™ connection box is installed as close as possible to where the modem will be located in your home
- Ensure you’ve considered the light that the nbn™ connection box emits e.g. it may not be a good idea to install it in a bedroom, home theatre room or any other room that you'd like to have dark on occasion
- Ensure the nbn™ connection box is not installed outside your property, in the garage, in a wet area or in a hard to reach location.
Note a standard nbn™ installation only allows for 40 metres of fibre optic cable connecting the nbn™ utility box (located outside your home) to your nbn™ connection box (located inside your home).
Do I need to pay for my NBN Co installation appointment?
If you live in a new estate, e.g. apartment/unit/house in a new development area, you may need to pay the $300 NBN Co new development charge for newly constructed buildings.
What is a NBN Co standard installation?
A standard NBN Co installation only allows for 40 metres of fibre optic cable connecting the nbn™ utility box (located outside your home) to your nbn™ connection box (located inside your home).
How long will it take to get my Central Coast Internet nbn™ service connected?
If you are already connected up with NBN Co equipment we’ll normally activate your Central Coast Internet service within 2-7 business days.
If you need an NBN Co Technician to connect your service you will need to make an appointment through us. We will let you know if you need an appointment when you join. Once your NBN Co appointment is completed we will need to complete your order on our end this can take 2-7 business days. We’ll send you an SMS when done.
Note that these are usual timeframes only, we may be able to get you online sooner or your order may take a little longer than anticipated.
How long will my NBN Co installation appointment take?
Typically, installation of the nbn™ connection box takes only half a day. But in some cases, a second appointment may be required because of the complexity of the installation (e.g. additional work may be required due to the location of the pre-installed nbn™ utility box or network configuration issues).
Will the NBN Co installation require me to put more cables/wires into my home?
No, all the cables and wires required to install the nbn™ connection box will be supplied by NBN Co; wires and cables required to connect your modem to the nbn™ connection box will be supplied by us. If the NBN Co technician identifies on the day of your appointment that the distance between your pre-installed nbn™ utility box and the location of your to-be-installed nbn™ connection box exceeds 40 metres, or if you need an unconventional set-up, you will need to get a certified electrician in to wire your home the way you want it at your own cost.
What happens on installation day?
This depends on the type of nbn™ service being connected and whether there has been nbn™ equipment previously connected. Central Coast Internet will advise you in advance if the nbn™ technician requires access into your premises.
If nbn™ equipment needs to be installed, Central Coast Internet will organise for NBN Co to install the nbn™ connection box at your home. On the day of the appointment, you or an authorised representative who is age 18 or over must be home for NBN Co to start the work and ensure that the nbn™ connection box is installed where you want it to be.
When the NBN Co technician arrives, you should discuss where you want your nbn™ connection box to be installed. Note a standard nbn™ installation only allows for 40 metres of cabling connecting the nbn™ utility box (located outside your home) to your nbn™ connection box (located inside your home).
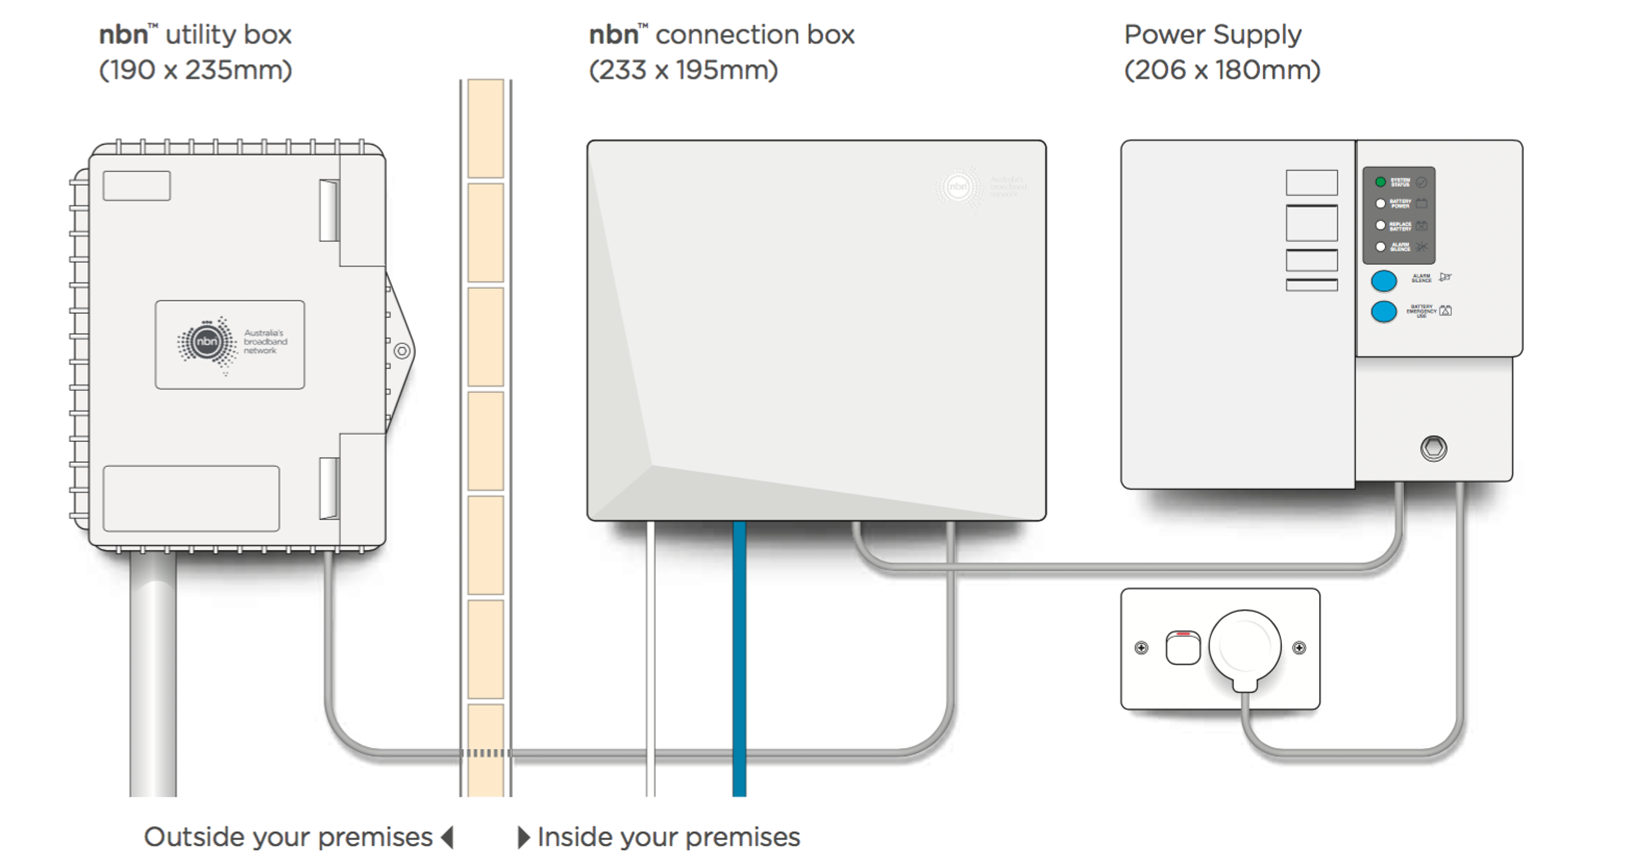
What is the difference between a nbn™ utility box and a nbn™ connection box?
- nbn™ utility box or Premises Connection Device or PCD: a box installed on the outside wall of your home connecting your property to the nbn™ fibre optic cable on your street.
- nbn™ connection box or Network Termination Device or NTD: a box installed inside your home connected to the outside nbn™ utility box. It is where you can plug in your modem
How do I setup modem for Central Coast Internet nbn™ FTTP?
The instructions below cover a few simple steps to get your Central Coast Internet supplied modem up and running.
If you are using your own modem, then please also refer to the “USING YOUR OWN MODEM” section below.
To help you identify your nbn™ equipment, here is a picture of the typical nbn™ equipment found inside and outside your home.
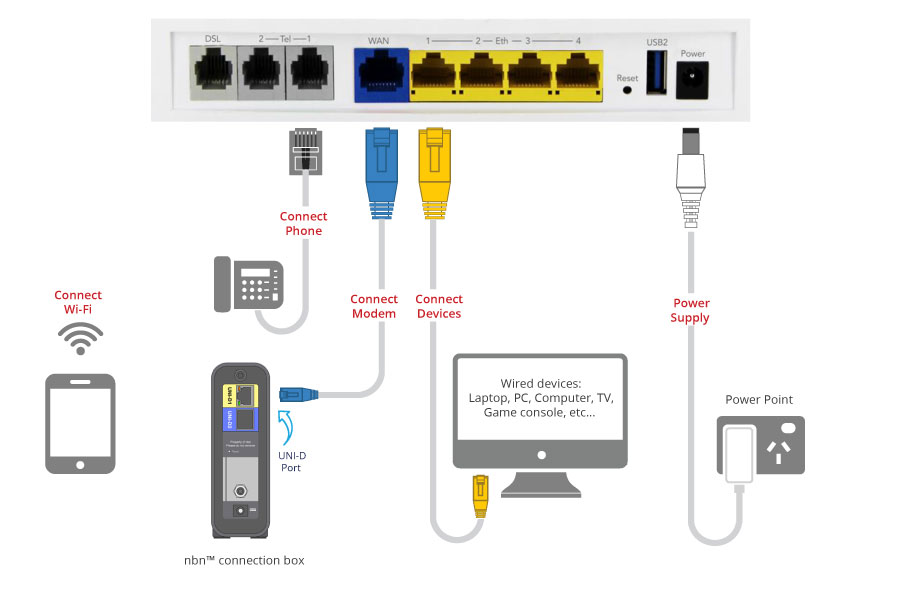
Connecting the Hardware
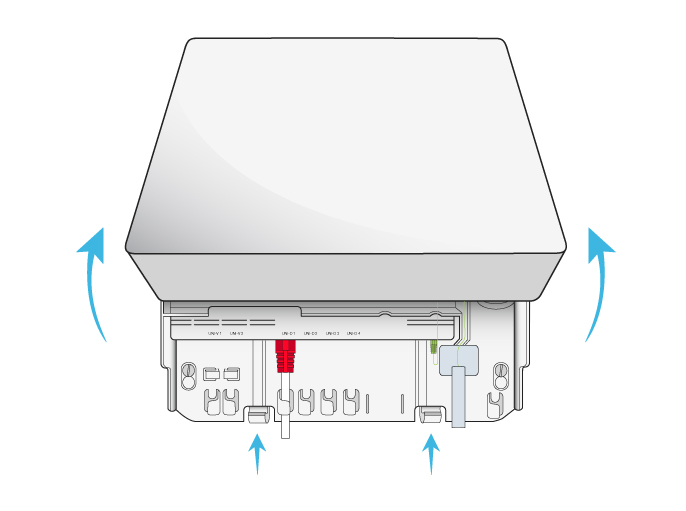
- Locate your nbn™ connection box. If there is a cover on your nbn™ connection box, first remove the cover by pressing the two clips at the base (either together or one at a time); then lift the cover at an angle to remove (see image below). If there is no cover, proceed to Step 2
- Check that the power and optical lights on your nbn™ connection box are both displaying green. If they are not green, please contact us.
- Plug the black power adaptor into a power point, and connect the other end to the port on the back of your modem.
- Turn on the power button and wait 60 seconds.
- Next, take the yellow RJ45 Ethernet cable, and plug it into the socket labelled WAN on the back of your modem.
- Refer back to your activation e-mail from Central Coast Internet titled ‘Your Central Coast Internet nbn™ Broadband is ready to go’ and check which UNI-D socket your service has been activated on. Now locate that UNI-D socket on your nbn™ Connection Box and plug in the other end of the Ethernet cable.
- After a minute or so, you should see the WAN light and Internet light on the front of your modem turn green. The internet light will flash green and the WAN will turn solid green.
- Once the Power light, Internet light and WAN light on your modem are green, you’re ready to connect your devices to the internet!
Connecting Your Computer/Devices
You can connect to the internet with your Central Coast Internet service one of two ways, using Wi-FI or an Ethernet cable.
WIFI
- Turn on Wi-Fi on your computer/device.
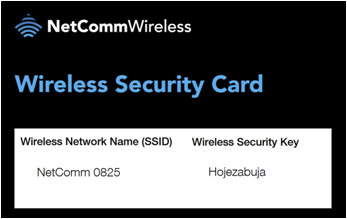
- On your computer/device find and select the Wi-Fi Network Name displayed on the Wi-Fi information card.
- Type in the Wi-Fi Password found on the Wi-Fi information card when asked.
- The ‘WiFi’ LED on the front of the modem will turn green when a device is properly connected.
You can connect all of your laptops, tablets, smartphones and other Wi-Fi enabled devices via this method
ETHERNET
- To connect via Ethernet, connect one end of the yellow Ethernet cable into any of the sockets on the back of your modem that are labelled 'Eth' or ‘LAN’.
- Now plug the other end your computer’s Ethernet network port.
- The LAN LED on the front of the modem will turn green when a device is properly connected.
Using Your Own Modem
If you are using your own modem, as opposed to a modem supplied by Central Coast Internet, then use the following settings while following the setup guide for your modem.
- Encapsulation/Connection Type/WAN Type: PPPoE
- Multiplexing: LLC
- Network Username: You can find your username in the ‘Your Central Coast Internet nbn™ Broadband is ready to go’ email you received from Central Coast Internet.
- Network Password: You can find your username in the ‘Your Central Coast Internet nbn™ Broadband is ready to go’ email you received from Central Coast Internet.
- VPI: 8
- VCI: 35
Even if you are using your own modem, “CONNECTING THE HARDWARE” section is still relevant.
How do I setup modem for Central Coast Internet nbn™ FTTN/FTTB?
The instructions below cover a few simple steps to get your Central Coast Internet supplied modem up and running.
If you are using your own modem, then please also refer to the “USING YOUR OWN MODEM” section below.
Connecting the Hardware
Your Central Coast Internet modem will connect to any telephone wall socket. For the best Wi-Fi coverage, place your modem as central as possible to where you use your Wi-Fi devices the most.
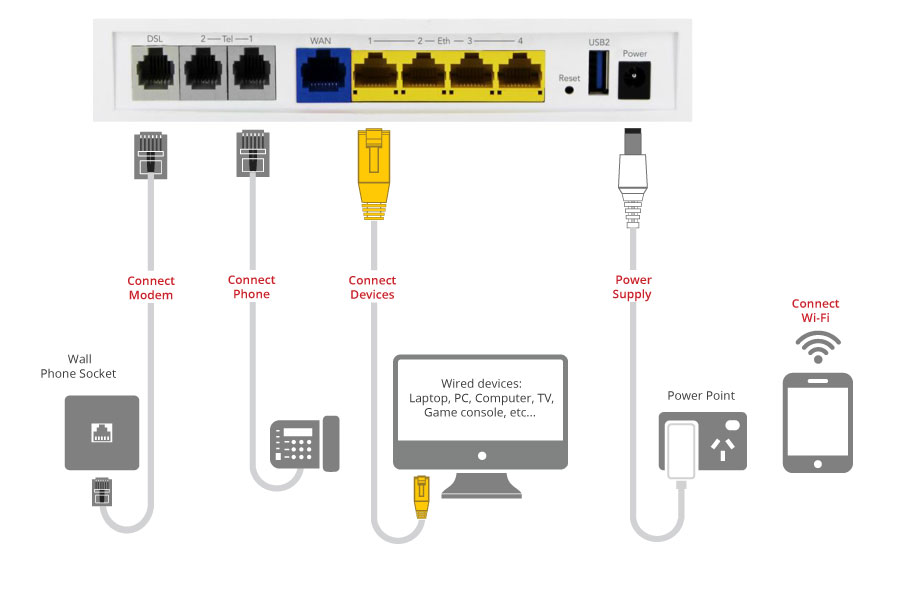
- Unplug your existing telephone device (if you have one) from the telephone wall socket you will be using for your nbn™ FTTN/FTTB connection.
- Connect one end of the supplied RJ11 telephone cable to the telephone wall socket and the other end to the DSL port on the back of the your modem.
- Connect the included power adapter to the Power jack of the modem and then plug it into an available wall socket. Press the ON/OFF button to power the router on. The Power light illuminates in red. When the modem has finished booting up, the Power light turns green.
Connecting Your Computer/Devices
You can connect to the internet with your Central Coast Internet service one of two ways, using Wi-FI or an Ethernet cable.
WIFI
- Turn on Wi-Fi on your computer/device.
- On your computer/device find and select the Wi-Fi Network Name displayed on the Wi-Fi information card.
- Type in the Wi-Fi Password found on the Wi-Fi information card when asked.
- The ‘WiFi’ LED on the front of the modem will turn green when a device is properly connected.
You can connect all of your laptops, tablets, smartphones and other Wi-Fi enabled devices via this method
ETHERNET
- To connect via Ethernet, plug the supplied RJ45 Ethernet cable to one of the yellow Ethernet ports (1-4) on the back of the modem.
- Plug the other end into your computer’s Ethernet network port.
- The LAN LED on the front of the modem will turn green when a device is properly connected.
Using Your Own Modem
If you are using your own modem, as opposed to a modem supplied by Central Coast Internet, then use the following settings while following the setup guide for your modem.
- Encapsulation/Connection Type/WAN Type: PPPoE
- Multiplexing: LLC
- Network Username: You can find your username in the ‘Your Central Coast Internet nbn™ Broadband is ready to go’ email you received from Central Coast Internet.
- Network Password: You can find your username in the ‘Your Central Coast Internet nbn™ Broadband is ready to go’ email you received from Central Coast Internet.
- VPI: 8
- VCI: 35
Even if you are using your own modem, CONNECTING THE HARDWARE section is still relevant.
How do I setup modem for Central Coast Internet nbn™ HFC?
The instructions below cover a few simple steps to get your Central Coast Internet supplied modem up and running.
If you are using your own modem, then please also refer to the “Using your Own Modem” section below.
Connecting the Hardware
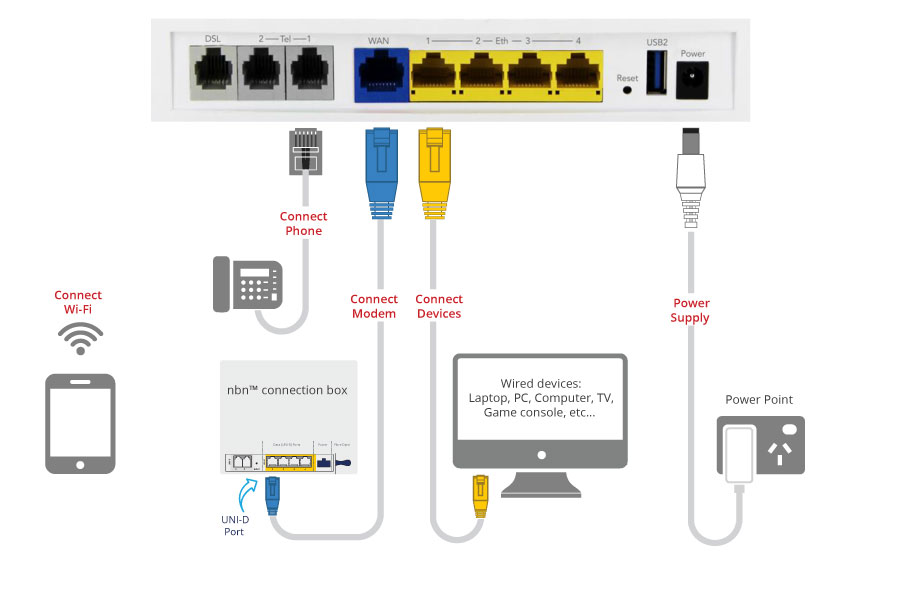
- Check that the power and optical lights on your nbn™ connection box are both displaying green. If they are not green, please contact us.
- At the back of the nbn™ connection box locate the yellow UNI-D Port.
- Connect the yellow Ethernet Cable to the ‘UNI-D’ port on the back of the nbn™ Connection Box. Connect the other end of the yellow Ethernet Cable to the blue ‘WAN’ port on the back of the modem.
- Connect the Power Adaptor to the Power port on the back of your modem.
- Press the power On/Off switch.
- Optional - Connect the telephone cable from your existing telephone device to the Tel port on the back of the your modem.
Connecting Your Computer/Devices
You can connect to the internet with your Central Coast Internet service one of two ways, using Wi-FI or an Ethernet cable.
WIFI
- Turn on Wi-Fi on your computer/device.
- On your computer/device find and select the Wi-Fi Network Name displayed on the Wi-Fi information card.
- Type in the Wi-Fi Password found on the Wi-Fi information card when asked.
- The ‘WiFi’ LED on the front of the modem will turn green when a device is properly connected.
You can connect all of your laptops, tablets, smartphones and other Wi-Fi enabled devices via this method
ETHERNET
- To connect via Ethernet, connect one end of the yellow Ethernet cable into any of the sockets on the back of your modem that are labelled 'Eth' or ‘LAN’.
- Now plug the other end your computer’s Ethernet network port.
- The LAN LED on the front of the modem will turn green when a device is properly connected.
Using Your Own Modem
If you are using your own modem, as opposed to a modem supplied by Central Coast Internet, then use the following settings while following the setup guide for your modem.
- Encapsulation/Connection Type/WAN Type: PPPoE
- 802.1Q: disabled
- Network Username: You can find your username in the ‘Your Central Coast Internet nbn™ Broadband is ready to go’ email you received from Central Coast Internet.
- Network Password: You can find your username in the ‘Your Central Coast Internet nbn™ Broadband is ready to go’ email you received from Central Coast Internet.
- VLAN Priorty: -1 (or Null)
- VLAN ID: -1 (or Null)
Even if you are using your own modem, CONNECTING THE HARDWARE section is still relevant.
How do I setup modem for Central Coast Internet nbn™ Fixed Wireless?
The instructions below cover a few simple steps to get your Central Coast Internet supplied modem up and running.
If you are using your own modem, then please also refer to the USING YOUR MODEM section below.
To help you identify your nbn™ equipment, here is a picture of the typical nbn™ equipment found inside and outside your home.
}})
Connecting the Hardware
- Locate your nbn™ connection box. If there is a cover on your nbn™ connection box, first remove the cover by pressing the two clips at the base (either together or one at a time); then lift the cover at an angle to remove (see image below). If there is no cover, proceed to Step 2
- Check that the power and optical lights on your nbn™ connection box are both displaying green. If they are not green, please contact us.
- Plug the black power adaptor into a power point, and connect the other end to the port on the back of your modem.
- Turn on the power button and wait 60 seconds.
- Next, take the yellow RJ45 Ethernet cable, and plug it into the socket labelled WAN on the back of your modem.
- Refer back to your activation e-mail from Central Coast Internet titled ‘Your Central Coast Internet nbn™ Broadband is ready to go’ and check which UNI-D socket your service has been activated on. Now locate that UNI-D socket on your nbn™ Connection Box and plug in the other end of the Ethernet cable.
- After a minute or so, you should see the WAN light and Internet light on the front of your modem turn green. The internet light will flash green and the WAN will turn solid green.
- Once the Power light, Internet light and WAN light on your modem are green, you’re ready to connect your devices to the internet!
}})
Connecting Your Computer/Devices
You can connect to the internet with your Central Coast Internet service one of two ways, using Wi-FI or an Ethernet cable.
WIFI
- Turn on Wi-Fi on your computer/device.
- On your computer/device find and select the Wi-Fi Network Name displayed on the Wi-Fi information card.
- Type in the Wi-Fi Password found on the Wi-Fi information card when asked.
- The ‘WiFi’ LED on the front of the modem will turn green when a device is properly connected.
You can connect all of your laptops, tablets, smartphones and other Wi-Fi enabled devices via this method
ETHERNET
- To connect via Ethernet, connect one end of the yellow Ethernet cable into any of the sockets on the back of your modem that are labelled 'Eth' or ‘LAN’.
- Now plug the other end your computer’s Ethernet network port.
- The LAN LED on the front of the modem will turn green when a device is properly connected.
Using Your Own Modem
If you are using your own modem, as opposed to a modem supplied by Central Coast Internet, then use the following settings while following the setup guide for your modem.
- Encapsulation/Connection Type/WAN Type: PPPoE
- Multiplexing: LLC
- Network Username: You can find your username in the ‘Your Central Coast Internet nbn™ Broadband is ready to go’ email you received from Central Coast Internet.
- Network Password: You can find your username in the ‘Your Central Coast Internet nbn™ Broadband is ready to go’ email you received from Central Coast Internet.
- VPI: 8
- VCI: 35
Even if you are using your own modem, “CONNECTING THE HARDWARE” section is still relevant.
Troubleshooting nbn™ FTTB/FTTN for No Connection
If you're unable to connect to the internet and you are on the nbn™, please try these troubleshooting steps.
Things to check first
- A modem/router must support VDSL2 in order to work on the nbn™ FTTB/FTTN networks. Plugging in an incompatible modem may cause your connection to be blocked to prevent network issues, which means it won't work even when you switch to a compatible modem. If you believe this is the case, please call us on 1300 746 754, as we'll need to get your connection enabled again. All modems provided by Central Coast Internet are nbn™ ready.
- If you haven't already done so, follow the setup guide for your Central Coast Internet modem to plug it in and configure it for nbn™ FTTB/N.
- Check that all cables are in good condition and plugged in securely.
Troubleshooting
STEP 1: RESTART YOUR MODEM
Remove the power cable from the back of your modem for 60 seconds, then plug it back in. After approximately 2 minutes the lights on the modem should settle into a stable pattern.
Are you able to connect to the internet?
If No, please go to Step 2.
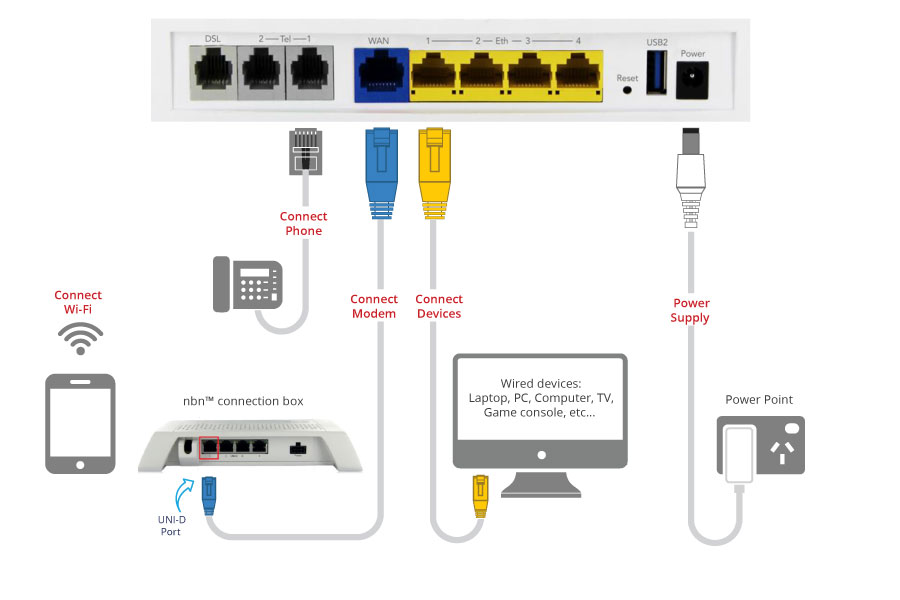
STEP 2: CHECK YOUR CABLE SETUP
Are your cables connected as on the image below?
If not, please change your cable setup to match it.
If your cables setup matches the image and the internet still isn't working, go to the next step.
STEP 3: CHECK YOUR WIRING
Has there ever been an internet or phone connection installed previously at this address?
- YES: Check the wiring and existing sockets throughout the premise for any line filters and remove them. Restart your modem again and try open a web page. Not able to browse? Continue to the next step.
- NO: Continue to the next step
STEP 4: CHECK THE MODEM CONNECTION
On your modem, the DSL light is:
- Off: Check the cabling from the nbn™ Wall Socket outlet is connected properly to the DSL port on the back of your modem.
- Green Blinking: Synching - please wait 10 minutes for sync to complete. Then, try and open a page web page on your device. Not able to browse? Continue to the next step.
- Green The service is synchronised - continue to the next step.
Check if you can connect to the Internet. Not able to browse? The problem could be the phone cable between the modem and the wall socket.
If you can connect the modem to the nbn™ Wall Socket using a different phone cable.
If you can connect to the Internet now, it looks like your phone cable was faulty. Please continue using the cable you have plugged in now.
Not able to browse? Continue to the next step.
STEP 5: CHECK THE DATA CONNECTION TO YOUR MODEM
- Look at the lights on your modem again. Is the 'Internet' lights green?
- YES: It looks like your nbn™ connection is reaching your modem, but not your devices. Please go to the next item.
- NO: it looks like the problem is with the connection between your modem and the nbn™ connection box. Please go to step 9.
- Is your device connected via Ethernet cable or Wi-Fi?
- Ethernet:
- Connect the modem to the nbn™ connection box using a different ethernet cable.
- Connect a different device to the modem, using this Ethernet cable.
- Wi-Fi:
- If possible try connecting to the modem via Ethernet Cable, to check whether you have an issue with your modem or with your Wi-Fi connection.
- Refresh your modem connection by turning your modem off and on again, and computer/device at the same time and allowing a few minutes to start a fresh connection
If you can, please check the following:
If you can connect to the Internet now, it looks like your Ethernet cable was faulty. Please continue using the cable you have plugged in now.
If you still cannot connect, please go to the next item.
If you can connect to the Internet now, it looks like the problem is with your first device. It could be a hardware problem or the way it's configured.
If you still cannot connect, it means the internet is not working on more than one device and you have tried more than one cable. Please go to Step 9.
STEP 6: RESTORE YOUR MODEM
If you have tried all the above steps it may help to restore the factory default settings.
Please note: all settings in your modem are deleted during this process.
- Press and hold the Reset button on the back of your modem for ten seconds using a sharp-pointed non-metallic object.
- You will have to wait a few minutes for the modem to reboot.
- To reconfigure your modem please refer to the 'Setting up guides' list of FAQs.
STEP 7: CHECK YOUR nbn™ WALL SOCKET
With a nbn™ installation only one of your wall sockets will work on the nbn™ network, all the other sockets inside your property will no longer work.
In most instances nbn™ CO will activate the closest outlet to where any cables enter the property (most likely towards the front of the property) However depending on the phone wiring inside your property this outlet may not be the one you previously used on a DSL internet connection.
The only way to test this is to test out the other sockets on your property.
STEP 8: STILL NEED HELP?
Thanks for trying to troubleshoot the problem, it looks like we'll need to investigate it further with you. Please contact us on 1300 746 754 so we can help you out.
Troubleshooting nbn™ FTTB/FTTN for Dropouts
If you are experiencing connection dropouts on an nbn™ Fibre to the Building or Fibre to the Node (FTTB/FTTN) service try the troubleshooting steps below.
Troubleshooting
STEP 1: RESTART YOUR MODEM
Remove the power cable from the back of your modem for 60 seconds, then plug it back in. After approximately 2 minutes the lights on the modem should settle into a stable pattern.
Are you able to connect to the internet?
If No, please go to Step 2.
STEP 2: CHECK YOUR CABLE SETUP
Are your cables connected as on the image below?
If not, please change your cable setup to match it.
If your cables setup matches the image and the internet still isn't working, go to the next step.
STEP 3: CHECK YOUR WIRING
Has there ever been an internet or phone connection installed previously at this address?
- YES: Check the wiring and existing sockets throughout the premise for any line filters and remove them. Your nbn™ connection doesn't need a splitter. In fact, it can cause interference.
- NO: Continue to the next step
Restart your modem again and try open a web page. Not able to browse? Continue to the next step.
STEP 4: CONDUCT AN 'ISOLATION TEST'
Conduct an 'isolation test' to identify if the issue is caused by another piece of equipment connected to your phone sockets.
- Unplug all devices from every phone socket, including your modem, line filters/splitters, telephones, fax machines, pay TV boxes and EFTPOS terminals.
- Connect the modem directly into the wall socket used for nbn™ FTTB/FTTN broadband. No line filter/splitter should be used for modem connections.
- Connect a computer to your modem with an Ethernet cable (recommended).
- YES: Looks like the dropouts are caused by one of the devices in your home.
- NO: Please go to the next step.
Does this stop the dropouts?
You will need to experiment with different devices or combination of devices to identify which it is. Ideally, you should plug in one device at a time and briefly monitor your internet connection for dropouts before plugging in another device. This will help you identify any specific hardware that may be causing the dropouts.
STEP 5: TEST USING DIFFERENT CABLES, MODEM
The problem could be the phone cable between the modem and the wall socket, Ethernet cable connecting your computer to the modem, or a faulty modem.
If possible, please try the following.
- Replace the phone cable between the modem and the wall socket. Reboot the modem. Wait for the lights to stabilise.
- Use a different Ethernet cable to connect your computer to the modem. Reboot the modem. Wait for the lights to stabilise.
- Test a different VDSL2-ready modem. If another modem doesn't give you dropouts, the original modem may be faulty.
If you still experience dropouts, please go to the next step.
STEP 6: STILL NEED HELP?
Thanks for trying to troubleshoot the problem, it looks like we'll need to investigate it further with you. Please contact us on 1300 746 754 so we can help you out.
Troubleshooting nbn™ FTTB/FTTN for Speed Issues
If you are experiencing speed issues on an nbn™ Fibre to the Building or Fibre to the Node (FTTB/FTTN) service try the troubleshooting steps below.
Please note: no matter what nbn™ technology you have, your nbn™ service can never go faster than the maximum line speed available at your premises. Due to a number of factors that affect your speed, your actual internet speed will often be less than the maximum line speed, particularly in peak periods.
Troubleshooting
STEP 1: RESTART YOUR COMPUTER
Please turn you computer off, wait 45 sec and then turn it back on. This will allow it's operating system to refresh, complete any updates and reset its connection to your ADSL modem.
Once it's restarted check if the connection is still slow.
If it's still happening, please go to Step 2.
STEP 2: RESTART YOUR MODEM
Power cycle your modem by turning the modem off for 20 seconds and then turning it back on. Wait about a minute for the modem to establish a stable connection and test again.
If the connection is still slow, please go to Step 3.
STEP 3: CLEAR YOUR BROWSER CACHE
Close all of your internet browser windows, including this one. Then re-open a single browser window and clear its cache.
A browser cache is a group of files, images, objects that are stored locally on your computer to speed up browsing. Sometimes having a large cache can affect the performance of the browser software itself.
Different browsers and browser versions will have specific steps to clear their cache. We recommend using your browser's help menu for assistance with cache clearing.
After you've cleared your cache - close your browser window, reopen it and check the connection speed again.
STEP 4: TURN OFF BACKGROUND SOFTWARE
You may have software running in the background that's taking up your bandwidth.
Common software includes:
- Security software (antivirus and firewall)
- VPNs (virtual private networks)
- P2P software (peer to peer)
Try shutting down any of this software that you have running.
Could you browse normally after turning off background software?
- YES: I can browse normally now.
- NO: Please go to the next step.
STEP 5: USING A WI-FI CONNECTION?
Skip this step if your modem/router is already directly connected to your computer via an Ethernet cable.
- Disable the Wi-Fi and/or remove the Wi-Fi router if it is a separate device.
- Connect your modem directly to your computer with an Ethernet cable.
- Restart your computer.
- Switch your modem off for 45 secs and back on again.
- Once your modem lights have become stable, check for the browsing speed.
Could you browse normally after connecting directly to your modem/router via an Ethernet cable?
- YES: It's probably your Wi-Fi connection.
- Make sure there is at least 30 cm separation between your modem/router and any other wireless broadcasting or high power equipment in your home. eg. wireless doorbells, signal repeaters or boosters, Bluetooth devices, computers, microwaves, etc.
- Make sure your computer/device is within the range of the router/modem, as specified by your manufacturer. Walls, floors and ceilings and other electrical equipment can interfere with or weaken your Wi-Fi signal.
- NO: Please go to the next step.
Please try the following:
STEP 6: CONDUCT AN 'ISOLATION TEST'
Conduct an 'isolation test' to identify if the issue is caused by another piece of equipment connected to your phone sockets.
- Unplug all devices from every phone socket, including your modem, line filters/splitters, telephones, fax machines, pay TV boxes and EFTPOS terminals.
- Connect the modem directly into the wall socket used for nbn™ FTTB/FTTN broadband. No line filter/splitter should be used for modem connections.
- Connect a computer to your modem with an Ethernet cable (recommended). If you have any other computers cable-connected to your modem, unplug their Ethernet cables.
- YES: Looks like the speed issue is caused by one of the devices in your home.
- NO: Please go to the next step.
Is the connection speed back to normal?
You will need to experiment with different devices or combination of devices to identify which it is. Ideally, you should plug in one device at a time and check the connection speed before plugging in another device. This will help you identify any specific hardware that may be causing the speed issue.
STEP 7: STILL NEED HELP?
Thanks for trying to troubleshoot the problem, it looks like we'll need to investigate it further with you. Please contact us on 1300 746 754 so we can help you out.
Troubleshooting nbn™ FTTP for No Connection
If you're unable to connect to the internet and you are on the nbn™, please try these troubleshooting steps.
Troubleshooting
STEP 1: RESTART YOUR MODEM
Remove the power cable from the back of your modem for 60 seconds, then plug it back in. After approximately 2 minutes the lights on the modem should settle into a stable pattern.
Are you able to connect to the internet?
If No, please go to Step 2.
STEP 2: CHECK YOUR CABLE SETUP
Are your cables connected as on the image below?
If not, please change your cable setup to match it.
If your cables setup matches the image and the internet still isn't working, go to the next step.
STEP 3: CHECK YOUR WIRING
Has there ever been an internet or phone connection installed previously at this address?
- YES: Check the wiring and existing sockets throughout the premise for any line filters and remove them. Restart your modem again and try open a web page. Not able to browse? Continue to the next step.
- NO: Continue to the next step
STEP 4: CHECK THE POWER TO THE nbn™ CONNECTION BOX
Remove the power cable to your nbn™ connection box (your nbn™ equipment) at the power socket, then after 15 seconds plug this back in. Confirm this cable is not plugged into a power board as this can cause problems with power to your nbn™ connection box.
Check the Power Light inside your nbn™ connection box.
Note: You may need to remove the cover by pressing the two clips at the base and pulling the base of the cover out (please don't use force to remove it or touch / uncoil the cables inside).
- It's Flashing Green - The nbn™ connection box is still starting up. This will change soon
- It's Solid Green - The nbn™ connection box's power supply is working correctly. Continue onto the next step
- It's Solid Red - The nbn™ connection box is running on battery power. Please check the power cable on your nbn™ connection box.
- YES: It looks like there is a problem with your nbn™ connection box. Please go to step 10.
- NO: Please plug the nbn™ connection box power cable into the nearest power point, and turn it on. Wait for all lights to stabilise. This usually takes a few minutes. Is the 'Power' light now green? If NO, It looks like there is a problem with your nbn™ connection box, please go to step 10. If YES, please check if you can browse now. If still not, please go to the next step.
- It's Off - Double check that the power supply cable is plugged in correctly.
- YES: It looks like there is a problem with your nbn™ connection box. Please go to step 10.
- NO: Please plug the nbn™ connection box power cable into the nearest power point, and turn it on. Wait for all lights to stabilise. This usually takes a few minutes. Is the 'Power' light now green? If NO, It looks like there is a problem with your nbn™ connection box, please go to step 10. If YES, please check if you can browse now. If still not, please go to the next step.
Is the nbn™ connection box power cable plugged in to a power point and turned on?
Is the nbn™ connection box power cable plugged in to a power point and turned on?
STEP 5: CHECK THE CONNECTION TO nbn™ CONNECTION BOX
Check the Optical Light inside your nbn™ connection box:

- It's Flashing Green - You have an active connection which is transferring data, please go to the next step
- It's Solid Green - You have an active connection, however it's not transferring data, please go to the next step.
- It's Solid Red - Restart your nbn™ connection box, following the instructions below:
- Turn off the power point and take the plug out of the socket.
- Wait 1-2 minutes, and then Plug the nbn™ connection box power cable back into the power point, and turn it on.
- Wait for all lights to stabilise. This usually takes a few minutes.
- YES: can you browse now? If not, please go to the next step.
- NO: it looks like there is a problem with your nbn™ connection box, please go to step 10.
- It's Off - Restart your nbn™ connection box, following the instructions below:
- Turn off the power point and take the plug out of the socket.
- Wait 1-2 minutes, and then Plug the nbn™ connection box power cable back into the power point, and turn it on.
- Wait for all lights to stabilise. This usually takes a few minutes.
- YES: can you browse now? If not, please go to the next step.
- NO: it looks like there is a problem with your nbn™ connection box, please go to step 10.
Is the 'Optical' light now green?
Is the 'Optical' light now green?
STEP 6: CHECK THE UNI-D PORT ON THE nbn™ CONNECTION BOX
Look at the lights on your nbn™ connection box again. What colour is the 'UNI-D1' Light?
- Green: please go to the next step.
- Yellow: please go to the next step
- Off: Look at the cable coming from your modem. Is it plugged into the correct UNI-D port? If YES, please go to step 10, otherwise to the next step.
STEP 7: CONNECT ANOTHER DEVICE TO THE nbn™ CONNECTION BOX
Please connect a device such as a laptop or PC directly to the 'UNI-D1' port on the nbn™ connection box.
Can you connect to the internet with the laptop or computer you plugged into the UNI-D1 port?
- YES: now plug your modem back into the 'UNI-D1' port. Wait two minutes for the modem lights to stabilise, then reconnect your device to the modem. Can your device connect to the internet now? If NO, please go to the next step.
- NO: Try connecting the same device to the 'UNI-D1' port using a different ethernet cable.
- YES: Now plug your modem back into the 'UNI-D1' port using the same Ethernet cable. Check if you can connect to the Internet now. If YES, it looks like the problem was caused by a faulty Ethernet cable. To keep using the internet, please continue using the cable you have plugged in now. If NO, it is likely that the problem is with your nbn™ connection box. Please go to step 10.
- NO: it is likely that the problem is with your nbn™ connection box. Please go to step 10.
Can your device connect to the internet now?
STEP 8: CHECK YOUR MODEM
- Check that your modem is plugged in to a power point that is switched on and that the modem 'On/Off' button is pressed in. Is the 'Power' light green?
- YES: please go to the next item.
- NO: please go to step 10.
- Look at the lights on your modem again. Is the 'Internet' lights green?
- YES: It looks like your nbn™ connection is reaching your modem, but not your devices. Please go to the next item.
- NO: it looks like the problem is with the connection between your modem and the nbn™ connection box. Please go to step 10.
- Is your device connected via Ethernet cable or Wi-Fi?
- Ethernet:
- Connect the modem to the nbn™ connection box using a different ethernet cable.
- Connect a different device to the modem, using this Ethernet cable.
- Wi-Fi:
- If possible try connecting to the modem via Ethernet Cable, to check whether you have an issue with your modem or with your Wi-Fi connection.
- Refresh your modem connection by turning your modem off and on again, and computer/device at the same time and allowing a few minutes to start a fresh connection
If you can, please check the following:
If you can connect to the Internet now, it looks like your Ethernet cable was faulty. Please continue using the cable you have plugged in now.
If you still cannot connect, please go to the next item.
If you can connect to the Internet now, it looks like the problem is with your first device. It could be a hardware problem or the way it's configured.
If you still cannot connect, it means the internet is not working on more than one device and you have tried more than one cable. Please go to step 10.
STEP 9: RESTORE YOUR MODEM
If you have tried all the above steps it may help to restore the factory default settings.
Please note: all settings in your modem are deleted during this process.
- Press and hold the Reset button on the back of your modem for ten seconds using a sharp-pointed non-metallic object.
- You will have to wait a few minutes for the modem to reboot.
- To reconfigure your modem please refer to the 'Setting up guides' list of FAQs.
STEP 10: GIVE US A CALL
Thanks for trying to troubleshoot the problem, it looks like we'll need to investigate it further with you. Please contact us on 1300 746 754 so we can help you out.
Troubleshooting nbn™ FTTP for Dropouts
If you are experiencing connection dropouts on an nbn™ Fibre to the Premises (FTTP) service try the troubleshooting steps below.
Troubleshooting
STEP 1: RESTART YOUR COMPUTER
Please turn you computer off, wait 45 sec and then turn it back on. This will allow it's operating system to refresh, complete any updates and reset its connection to your ADSL modem.
Once it's restarted check if you still experience dropouts,.
If it's still happening, please go to Step 2.
STEP 2: RESTART YOUR MODEM
Power cycle your modem by turning the modem off for 20 seconds and then turning it back on. Wait about a minute for the modem to establish a stable connection and test again.
If you still experience dropouts, please go to Step 3.
STEP 3: CHECK YOUR CABLE SETUP
Are your cables connected as on the image below?
If not, please change your cable setup to match it.
If your cables setup matches the image and the internet still isn't working, go to the next step.
STEP 4: CHECK YOUR WIRING
Has there ever been an internet or phone connection installed previously at this address?
- YES: Check the wiring and existing sockets throughout the premise for any line filters and remove them. Restart your modem again and check if you still experience dropouts. If yes, continue to the next step.
- NO: Continue to the next step
STEP 5: CHECK THE CONNECTION TO nbn™ CONNECTION BOX
Check the Optical Light inside your nbn™ connection box:
}})
- It's Flashing Green - You have an active connection which is transferring data, please go to the next step
- It's Solid Green - You have an active connection, however it's not transferring data, please go to the next step.
- It's Solid Red - Restart your nbn™ connection box, following the instructions below:
- Turn off the power point and take the plug out of the socket.
- Wait 1-2 minutes, and then Plug the nbn™ connection box power cable back into the power point, and turn it on.
- Wait for all lights to stabilise. This usually takes a few minutes.
- YES: do you experience dropouts? If yes, please go to the next step.
- NO: it looks like there is a problem with your nbn™ connection box, please go to step 8.
- It's Off - Restart your nbn™ connection box, following the instructions below:
- Turn off the power point and take the plug out of the socket.
- Wait 1-2 minutes, and then Plug the nbn™ connection box power cable back into the power point, and turn it on.
- Wait for all lights to stabilise. This usually takes a few minutes.
- YES: do you experience dropouts? If yes, please go to the next step.
- NO: it looks like there is a problem with your nbn™ connection box, please go to step 8.
Is the 'Optical' light now green?
Is the 'Optical' light now green?
STEP 6: CHECK THE UNI-D PORT ON THE nbn™ CONNECTION BOX
Look at the lights on your nbn™ connection box again. What colour is the 'UNI-D1' Light?
- Green: please go to the next step.
- Yellow: please go to the next step
- Off: Look at the cable coming from your modem. Is it plugged into the correct UNI-D port? If YES, please go to step 8, otherwise to the next step.
STEP 7: CONNECT ANOTHER DEVICE TO THE nbn™ CONNECTION BOX
Please connect a device such as a laptop or PC directly to the 'UNI-D1' port on the nbn™ connection box.
Do you still experience dropouts, with the laptop or computer plugged directly into the UNI-D1 port?
- NO: now plug your modem back into the 'UNI-D1' port. Wait two minutes for the modem lights to stabilise, then reconnect your device to the modem. Can your device connect to the internet now? If NO, please go to the next step.
- YES: Try connecting the same device to the 'UNI-D1' port using a different ethernet cable.
- NO: Now plug your modem back into the 'UNI-D1' port using the same Ethernet cable. Check if you still experience dropouts. If NO, it looks like the problem was caused by a faulty Ethernet cable. To keep using the internet, please continue using the cable you have plugged in now. If YES, it is likely that the problem is with your nbn™ connection box. Please go to step 7.
- YES: it is likely that the problem is with your nbn™ connection box. Please go to step 7.
Do you still experience dropouts?
STEP 8: GIVE US A CALL
Thanks for trying to troubleshoot the problem, it looks like we'll need to investigate it further with you. Please contact us on 1300 746 754 so we can help you out.
Troubleshooting nbn™ FTTP for Speed Issues
If you are experiencing speed issues on an nbn™ Fibre to the Premises (FTTP) service try the troubleshooting steps below.
Please note: no matter what nbn™ technology you have, your nbn™ service can never go faster than the maximum line speed available at your premises. Due to a number of factors that affect your speed, your actual internet speed will often be less than the maximum line speed, particularly in peak periods.
Troubleshooting
STEP 1: RESTART YOUR COMPUTER
Please turn you computer off, wait 45 sec and then turn it back on. This will allow it's operating system to refresh, complete any updates and reset its connection to your ADSL modem.
Once it's restarted check if the connection is still slow.
If it's still happening, please go to Step 2.
STEP 2: RESTART YOUR MODEM
Power cycle your modem by turning the modem off for 20 seconds and then turning it back on. Wait about a minute for the modem to establish a stable connection and test again.
If the connection is still slow, please go to Step 3.
STEP 3: CLEAR YOUR BROWSER CACHE
Close all of your internet browser windows, including this one. Then re-open a single browser window and clear its cache.
A browser cache is a group of files, images, objects that are stored locally on your computer to speed up browsing. Sometimes having a large cache can affect the performance of the browser software itself.
Different browsers and browser versions will have specific steps to clear their cache. We recommend using your browser's help menu for assistance with cache clearing.
After you've cleared your cache - close your browser window, reopen it and check the connection speed again.
STEP 4: TURN OFF BACKGROUND SOFTWARE
You may have software running in the background that's taking up your bandwidth.
Common software includes:
- Security software (antivirus and firewall)
- VPNs (virtual private networks)
- P2P software (peer to peer)
Try shutting down any of this software that you have running.
Could you browse normally after turning off background software?
- YES: I can browse normally now.
- NO: Please go to the next step.
STEP 5: USING A WI-FI CONNECTION?
Skip this step if your modem/router is already directly connected to your computer via an Ethernet cable.
- Disable the Wi-Fi and/or remove the Wi-Fi router if it is a separate device.
- Connect your modem directly to your computer with an Ethernet cable.
- Restart your computer.
- Switch your modem off for 45 secs and back on again.
- Once your modem lights have become stable, check for the browsing speed.
Could you browse normally after connecting directly to your modem/router via an Ethernet cable?
- YES: It's probably your Wi-Fi connection.
- Make sure there is at least 30 cm separation between your modem/router and any other wireless broadcasting or high power equipment in your home. eg. wireless doorbells, signal repeaters or boosters, Bluetooth devices, computers, microwaves, etc.
- Make sure your computer/device is within the range of the router/modem, as specified by your manufacturer. Walls, floors and ceilings and other electrical equipment can interfere with or weaken your Wi-Fi signal.
- NO: Please go to the next step.
Please try the following:
STEP 6: CONNECT ANOTHER DEVICE TO THE nbn™ CONNECTION BOX
Please connect a device such as a laptop or PC directly to the 'UNI-D1' port on the nbn™ connection box.
Do you still experience slow speeds, with the laptop or computer plugged directly into the UNI-D1 port?
- NO: now plug your modem back into the 'UNI-D1' port. Wait two minutes for the modem lights to stabilise, then reconnect your device to the modem. Can you experience acceptable speeds when connected to the internet now? If NO, please go to the next step.
- YES: Try connecting the same device to the 'UNI-D1' port using a different ethernet cable.
- NO: Now plug your modem back into the 'UNI-D1' port using the same Ethernet cable. Check if you still experience slow speeds. If NO, it looks like the problem was caused by a faulty Ethernet cable. To keep using the internet, please continue using the cable you have plugged in now. If YES, it is likely that the problem is with your nbn™ connection box. Please go to step 7.
- YES: it is likely that the problem is with your nbn™ connection box. Please go to step 7.
Do you still experience slow speeds?
STEP 7: GIVE US A CALL
Thanks for trying to troubleshoot the problem, it looks like we'll need to investigate it further with you. Please contact us on 1300 746 754 so we can help you out.
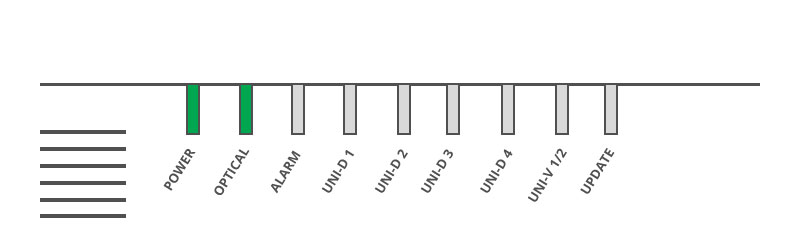
Status Lights on FTTP nbn™ conection box
The article will explain the meaning of the status lights found on the nbn™ connection box (indoor unit) used for Fibre to the Premises (FTTP) services.
These lights may help you quickly check on the status of your nbn™ connection which may be useful when troubleshooting nbn™ FTTP issues.
Please note that the FTTP nbn™ connection box should not be confused with the nbn™ connection box for nbn™ Fixed Wireless.
You may need to remove the cover on your nbn™ connection box to access the status lights.
Status lights
If you have an FTTP connection, the lights on your nbn™ conection box will look like this:
The table below tells you what the different light combinations mean:
| Light | Indicator | Meaning | Action |
|---|---|---|---|
| Power | Off | This means there is no power to your nbn™ connection box. | Check the nbn™ connection box is plugged in and switched on. If there is still no power light contact Central Coast Internet Support on 1300 746 754. |
| Solid red | Your nbn™ connection box is operating on backup battery power. | If there is a mains power failure, you will only have services over the nbn™ network for a limited period of up to five hours | |
| Solid green | Your power supply is working normally. | No action required | |
| Flashing green | Your nbn™ connection box is starting up. | No action required, the flashing light will turn solid shortly | |
| Optical | Off | Your nbn™ connection box has been disabled externally. | If restarting your nbn™ connection box doesn't fix the problem, contact Central Coast Internet Support on 1300 746 754 |
| Solid red | Your NTD has lost connection with the fibre network. | If restarting your nbn™ connection box doesn't fix the problem, contact Central Coast Internet Support on 1300 746 754 | |
| Solid green | Your NTD is connected and working properly. | No action required | |
| Flashing green | This is normal and simply means there is activity NA on the network. | No action required | |
| Alarm | Off | Your nbn™ connection box is working but you have no devices connected | No action required |
| Solid red | Your nbn™ connection box is not working normally | If restarting your nbn™ connection box doesn't fix the problem, contact Central Coast Internet Support on 1300 746 754 | |
| Solid green | Your NTD is working normally and is connected. | No action required | |
| Uni-D1 to Uni-D4 | Off | There are no active Ethernet devices connected to this port at this time. Either:
|
If you’re having difficulty with connected devices, restart your devices, Gateway and nbn™ connection box. If a restart doesn't fix the problem, contact Central Coast Internet Support on 1300 746 754 |
| Solid yellow | There is an active device detected on the network capable of operating at up to 1 gigabit per second (this denotes capability, not actual speed). | No action required | |
| Flashing yellow | There is data activity of up to 1 gigabit per second detected on the network (this denotes capability, not actual speed). | No action required | |
| Solid green | There is an active device detected on the network capable of operating at up to 100 megabits per second (this denotes capability, not actual speed). | No action required | |
| Flashing green | There is data activity of up to 100 megabits per second detected on the network network (this denotes capability, not actual speed). | No action required | |
| Uni-V 1/2 | Off | Expected state for Telstra services. | No action required |
| Update | Off | Normal status | No action required |
| Solid red | Your nbn™ connection box has failed to download a software update | Contact Central Coast Internet Support on 1300 746 754. | |
| Flashing green | Your nbn™ connection box is downloading a software update | Wait for the download to be completed, then check your service again. |
Troubleshooting nbn™ HFC for No connection
If you're unable to connect to the internet and you are on the nbn™, please try these troubleshooting steps.
Troubleshooting
STEP 1: RESTART YOUR MODEM
Remove the power cable from the back of your modem for 60 seconds, then plug it back in. After approximately 2 minutes the lights on the modem should settle into a stable pattern.
Are you able to connect to the internet?
If No, please go to Step 2.
STEP 2: CHECK YOUR CABLE SETUP
Are your cables connected as on the image below?
If not, please change your cable setup to match it.
If your cables setup matches the image and the internet still isn't working, go to the next step.
STEP 3: CHECK YOUR WIRING
Has there ever been an internet or phone connection installed previously at this address?
- YES: Check the wiring and existing sockets throughout the premise for any line filters and remove them. Restart your modem again and try open a web page. Not able to browse? Continue to the next step.
- NO: Continue to the next step
STEP 4: CHECK THE POWER TO THE nbn™ CONNECTION BOX
Check the Power Light inside your nbn™ connection box - depending on the connection box, the power light will be located as follows:
The Power light is:
- OFF - Unplug the power cable to your nbn™ connection box at the power socket, after 15 seconds plug this back in. Wait for all lights to stabilise. This usually takes a few minutes. Is the 'Power' light now green? If NO, it looks like there is a problem with your nbn™ connection box, please go to step 8. If YES, please check if you can browse now. If still not, please go to the next step.
- ON - This is what should be happening - please continue to the next step.
STEP 5: CHECK THE CONNECTION TO THE nbn™ CONNECTION BOX
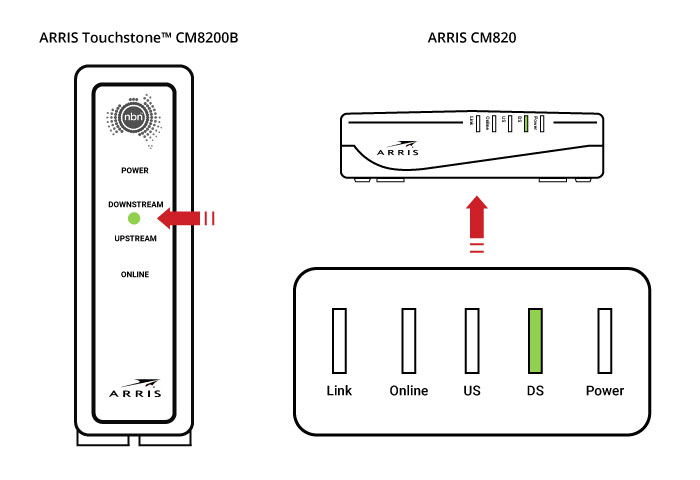
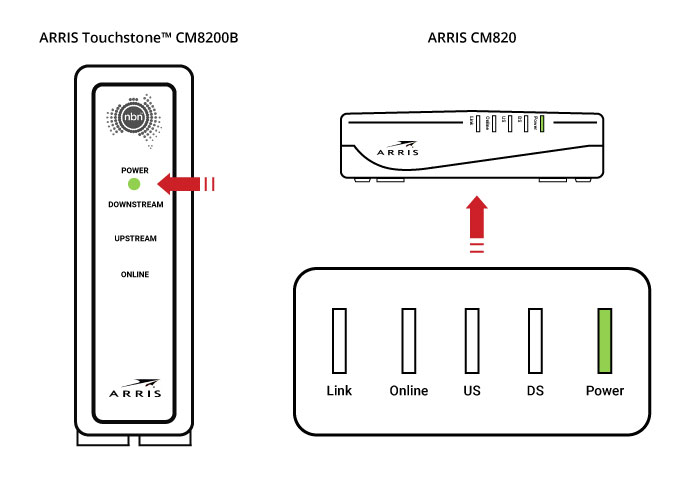
- ARRIS TOUCHSTONE™ CM8200B nbn™ CONNECTION BOX
- FLASHING GREEN: The nbn™ connection box is searching for a downstream connection (this can take up to 5 minutes to complete).
- If the ONLINE light is on at the same time the nbn™ connection box is upgrading its firmware, please allow 30 minutes for the firmware to upgrade.
- Check the coaxial cable: If it remains flashing after the gateway has finished booting up, check the coaxial cable connection - is it plugged into the connection box properly?
- If light is flashing for more than 30 minutes: please go templateo step 8.
- OFF: There is no internet connection
- Check the coaxial cable: if is it plugged from the wall plate into the nbn™ connection box properly?
- Has it just been turned on? Allow up to 30 minutes for the connection box to establish a connection to the nbn™
- GREEN: Your nbn™ connection box is connected to the network.
- ARRIS CM820
- FLASHING GREEN:
- Check the coaxial cable if is it plugged from the wall plate into the nbn™ connection box properly?
- OFF: There is no internet connection
- Check the coaxial cable if is it plugged from the wall plate into the nbn™ connection box properly?
- Has it just been turned on? Allow up to 30 minutes for the connection box to establish a connection to the nbn™
- GREEN: Your nbn™ connection box is connected to the network.
The Downstream light is:
Try open a web page on your device; Not able to browse? Continue to the next step
The DS light is:
Try open a web page on your device; Not able to browse? Continue to the next step
STEP 6: CHECK YOUR MODEM
- Check that your modem is plugged in to a power point that is switched on and that the modem 'On/Off' button is pressed in. Is the 'Power' light green?
- YES: please go to the next item.
- NO: please go to step 8.
- Look at the lights on your modem again. Is the 'Internet' lights green?
- YES: It looks like your nbn™ connection is reaching your modem, but not your devices. Please go to the next item.
- NO: it looks like the problem is with the connection between your modem and the nbn™ connection box. Please go to step 8.
- Is your device connected via Ethernet cable or Wi-Fi?
- Ethernet:
- Connect the modem to the nbn™ connection box using a different ethernet cable.
- Connect a different device to the modem, using this Ethernet cable.
- Wi-Fi:
- If possible try connecting to the modem via Ethernet Cable, to check whether you have an issue with your modem or with your Wi-Fi connection.
- Refresh your modem connection by turning your modem off and on again, and computer/device at the same time and allowing a few minutes to start a fresh connection
If you can, please check the following:
If you can connect to the Internet now, it looks like your Ethernet cable was faulty. Please continue using the cable you have plugged in now.
If you still cannot connect, please go to the next item.
If you can connect to the Internet now, it looks like the problem is with your first device. It could be a hardware problem or the way it's configured.
If you still cannot connect, it means the internet is not working on more than one device and you have tried more than one cable. Please go to Step 9.
STEP 7: RESTORE YOUR MODEM
If you have tried all the above steps it may help to restore the factory default settings.
Please note: all settings in your modem are deleted during this process.
- Press and hold the Reset button on the back of your modem for ten seconds using a sharp-pointed non-metallic object.
- You will have to wait a few minutes for the modem to reboot.
- To reconfigure your modem please refer to the 'Setting up guides' list of FAQs.
STEP 8: GIVE US A CALL
Thanks for trying to troubleshoot the problem, it looks like we'll need to investigate it further with you. Please contact us on 1300 746 754 so we can help you out.
Troubleshooting nbn™ HFC for Speed Issues
If you are experiencing speed issues on an nbn™ Hybrid Fibre-Coaxial (HFC) service try the troubleshooting steps below.
Please note: no matter what nbn™ technology you have, your nbn™ service can never go faster than the maximum line speed available at your premises. Due to a number of factors that affect your speed, your actual internet speed will often be less than the maximum line speed, particularly in peak periods.
Troubleshooting
STEP 1: RESTART YOUR COMPUTER
Please turn you computer off, wait 45 sec and then turn it back on. This will allow it's operating system to refresh, complete any updates and reset its connection to your ADSL modem.
Once it's restarted check if the connection is still slow.
If it's still happening, please go to Step 2.
STEP 2: RESTART YOUR MODEM
Power cycle your modem by turning the modem off for 20 seconds and then turning it back on. Wait about a minute for the modem to establish a stable connection and test again.
If the connection is still slow, please go to Step 3.
STEP 3: CLEAR YOUR BROWSER CACHE
Close all of your internet browser windows, including this one. Then re-open a single browser window and clear its cache.
A browser cache is a group of files, images, objects that are stored locally on your computer to speed up browsing. Sometimes having a large cache can affect the performance of the browser software itself.
Different browsers and browser versions will have specific steps to clear their cache. We recommend using your browser's help menu for assistance with cache clearing.
After you've cleared your cache - close your browser window, reopen it and check the connection speed again.
STEP 4: TURN OFF BACKGROUND SOFTWARE
You may have software running in the background that's taking up your bandwidth.
Common software includes:
- Security software (antivirus and firewall)
- VPNs (virtual private networks)
- P2P software (peer to peer)
Try shutting down any of this software that you have running.
Could you browse normally after turning off background software?
- YES: I can browse normally now.
- NO: Please go to the next step.
STEP 5: USING A WI-FI CONNECTION?
Skip this step if your modem/router is already directly connected to your computer via an Ethernet cable.
- Disable the Wi-Fi and/or remove the Wi-Fi router if it is a separate device.
- Connect your modem directly to your computer with an Ethernet cable.
- Restart your computer.
- Switch your modem off for 45 secs and back on again.
- Once your modem lights have become stable, check for the browsing speed.
Could you browse normally after connecting directly to your modem/router via an Ethernet cable?
- YES: It's probably your Wi-Fi connection.
- Make sure there is at least 30 cm separation between your modem/router and any other wireless broadcasting or high power equipment in your home. eg. wireless doorbells, signal repeaters or boosters, Bluetooth devices, computers, microwaves, etc.
- Make sure your computer/device is within the range of the router/modem, as specified by your manufacturer. Walls, floors and ceilings and other electrical equipment can interfere with or weaken your Wi-Fi signal.
- NO: Please go to the next step.
Please try the following:
STEP 6: CONNECT ANOTHER DEVICE TO THE nbn™ CONNECTION BOX
Please connect a device such as a laptop or PC directly to the 'UNI-D1' port on the nbn™ connection box.
Do you still experience slow speeds, with the laptop or computer plugged directly into the UNI-D1 port?
- NO: now plug your modem back into the 'UNI-D1' port. Wait two minutes for the modem lights to stabilise, then reconnect your device to the modem. Can you experience acceptable speeds when connected to the internet now? If NO, please go to the next step.
- YES: Try connecting the same device to the 'UNI-D1' port using a different ethernet cable.
- NO: Now plug your modem back into the 'UNI-D1' port using the same Ethernet cable. Check if you still experience slow speeds. If NO, it looks like the problem was caused by a faulty Ethernet cable. To keep using the internet, please continue using the cable you have plugged in now. If YES, it is likely that the problem is with your nbn™ connection box. Please go to step 7.
- YES: it is likely that the problem is with your nbn™ connection box. Please go to step 7.
Do you still experience slow speeds?
STEP 7: GIVE US A CALL
Thanks for trying to troubleshoot the problem, it looks like we'll need to investigate it further with you. Please contact us on 1300 746 754 so we can help you out.
Status Lights on HFC nbn™ conection box (Arris Touchstone® CM8200)
This article will explain the meaning of the status lights found on the Arris CM8200 modem, the default nbn™ connection box for nbn™ HFC as of 1 March 2017.
The lights on your nbn™ connection box provide information about the status of your connection.
Indicator Lights
ON THE BACK
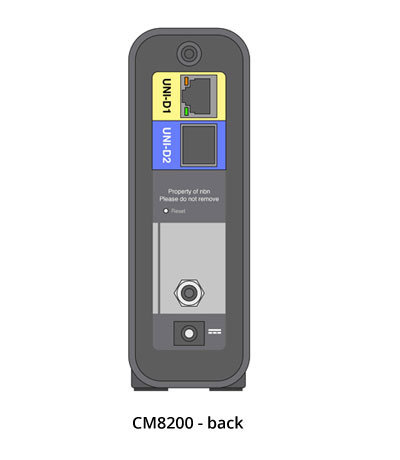
The UNI-D1 port on the back of the HFC nbn™ conection box has LINK lights to indicate cable connection to a computer or router.
- Green: Cable connection detected. If this light is off, try another CAT5e or CAT6 Ethernet cable.
- Yellow: Old CAT5 Ethernet cable is in use - this may not allow throughput of the full speed of your nbn™ HFC service.
ON THE FRONT
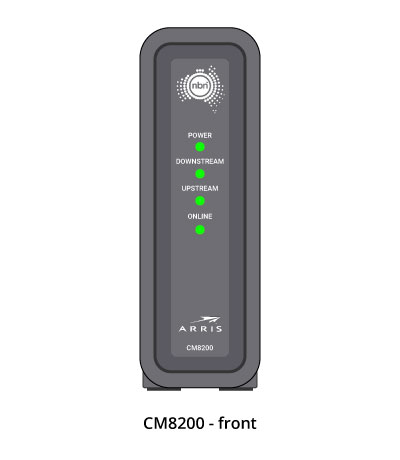
| Light | State | Meaning |
| POWER | Off | Connection Box has no power. |
| Green | Connection Box has power. | |
| DOWNSTREAM | Off | Connection Box has no power. |
| Green | Successful downstream connection. | |
| Flashing | Searching for downstream connection. If ONLINE light is on, firmware upgrade in progress. | |
| UPSTREAM | Off | Still searching for downstream connection, or Connection Box has no power. |
| Green | Successful downstream connection. | |
| Flashing | Downstream connection found; searching for upstream connection. If ONLINE light is on, firmware upgrade in progress. | |
| ONLINE | Off | Connection Box is offline or has no power. |
| Green | Connection Box is online and browsing should be possible. | |
| Flashing | Downstream and upstream connection found; retrieving setup information from nbn™. |
Status Lights on HFC nbn™ conection box (Arris CM820)
This article will explain the meaning of the status lights found on the Arris CM820 Cable Modem.
Indicator Lights

- Link - Ethernet connectivity between your nbnTM connection box and gateway (router).
- Online - nbnTM network connection.
- US - Upstream connectivity.
- DS - Downstream connectivity.
- Power - AC power.
Indicator lights: start-up sequence
| Link | Online | US | DS | Power | Mode |
| Off | Off | Off | Off | Off | No power to the nbnTM connection box |
| Flash | Flash | Flash | Flash | Flash | Power-on self test |
| Off | Off | Off | Flash | On | Downstream search |
| Off | Off | Flash | On | On | Downstream found; upstream search |
| Off | Flash | On | On | On | Downstream and upstream found; retrieving setup information from nbn |
| On | On | On | On | On | Ready for service |
Indicator lights: normal operation
| Link | Online | US | DS | Power | Mode |
| On | On | On | On | On | Ready for service |
| On | Off | Flash | Flash | On | Not connected to the nbnTM network |
| On | On | Flash | Flash | On | Firmware upgrade |
| Off | Off | Off | Off | Off | No power to the nbnTM connection box |
Troubleshooting nbn™ Fixed Wireless for No Connection
If you're unable to connect to the internet and you are on the nbn™, please try these troubleshooting steps.
Troubleshooting
STEP 1: RESTART YOUR MODEM
Remove the power cable from the back of your modem for 60 seconds, then plug it back in. After approximately 2 minutes the lights on the modem should settle into a stable pattern.
Are you able to connect to the internet?
If No, please go to Step 2.
STEP 2: CHECK YOUR CABLE SETUP
Are your cables connected as on the image below?
If not, please change your cable setup to match it.
If your cables setup matches the image and the internet still isn't working, go to the next step.
STEP 3: CHECK YOUR WIRING
Has there ever been an internet or phone connection installed previously at this address?
- YES: Check the wiring and existing sockets throughout the premise for any line filters and remove them. Restart your modem again and try open a web page. Not able to browse? Continue to the next step.
- NO: Continue to the next step
STEP 4: CHECK THE POWER TO THE nbn™; CONNECTION BOX
Remove the power cable to your nbn™ connection box (your nbn™ equipment) at the power socket, then after 15 seconds plug this back in. Confirm this cable is not plugged into a power board as this can cause problems with power to your nbn™ connection box.
Check the Power Light inside your nbn™ connection box.
Note: You may need to remove the cover by pressing the two clips at the base and pulling the base of the cover out (please don't use force to remove it or touch / uncoil the cables inside).
- It's Flashing Green - The nbn™ connection box is still starting up. This will change soon
- It's Solid Green - The nbn™ connection box's power supply is working correctly. Continue onto the next step
- It's Solid Red - Please check the power cable on your nbn™ connection box.
- YES: It looks like there is a problem with your nbn™ connection box. Please go to step 10.
- NO: Please plug the nbn™ connection box power cable into the nearest power point, and turn it on. Wait for all lights to stabilise. This usually takes a few minutes. Is the 'Power' light now green? If NO, It looks like there is a problem with your nbn™ connection box, please go to step 10. If YES, please check if you can browse now. If still not, please go to the next step.
- It's Off - Double check that the power supply cable is plugged in correctly.
- YES: It looks like there is a problem with your nbn™ connection box. Please go to step 10.
- NO: Please plug the nbn™ connection box power cable into the nearest power point, and turn it on. Wait for all lights to stabilise. This usually takes a few minutes. Is the 'Power' light now green? If NO, it looks like there is a problem with your nbn™ connection box, please go to step 10. If YES, please check if you can browse now. If still not, please go to the next step.
Is the nbn™ connection box power cable plugged in to a power point and turned on?
Is the nbn™ connection box power cable plugged in to a power point and turned on?
STEP 5: CHECK THE CONNECTION TO nbn™ CONNECTION BOX
Check the Optical Light inside your nbn™ connection box:
- It's Flashing Green - You have an active connection which is transferring data, please go to the next step
- It's Solid Green - You have an active connection, however it's not transferring data, please go to the next step.
- It's Solid Red - Restart your nbn™ connection box, following the instructions below:
- Turn off the power point and take the plug out of the socket.
- Wait 1-2 minutes, and then Plug the nbn™ connection box power cable back into the power point, and turn it on.
- Wait for all lights to stabilise. This usually takes a few minutes.
- YES: can you browse now? If not, please go to the next step.
- NO: it looks like there is a problem with your nbn™ connection box, please go to step 10.
- It's Off - Restart your nbn™ connection box, following the instructions below:
- Turn off the power point and take the plug out of the socket.
- Wait 1-2 minutes, and then Plug the nbn™ connection box power cable back into the power point, and turn it on.
- Wait for all lights to stabilise. This usually takes a few minutes.
- YES: can you browse now? If not, please go to the next step.
- NO: it looks like there is a problem with your nbn™ connection box, please go to step 10.
Is the 'Optical' light now green?
Is the 'Optical' light now green?
STEP 6: CHECK THE UNI-D PORT ON THE nbn™ CONNECTION BOX
Look at the lights on your nbn™ connection box again. What colour is the 'UNI-D1' Light?
- Green: please go to the next step.
- Yellow: please go to the next step
- Off: Look at the cable coming from your modem. Is it plugged into the correct UNI-D port? If YES, please go to step 10, otherwise to the next step.
STEP 7: CONNECT ANOTHER DEVICE TO THE nbn™ CONNECTION BOX
Please connect a device such as a laptop or PC directly to the 'UNI-D1' port on the nbn™ connection box.
Can you connect to the internet with the laptop or computer you plugged into the UNI-D1 port?
- YES: now plug your modem back into the 'UNI-D1' port. Wait two minutes for the modem lights to stabilise, then reconnect your device to the modem. Can your device connect to the internet now? If NO, please go to the next step.
- NO: Try connecting the same device to the 'UNI-D1' port using a different ethernet cable.
- YES: Now plug your modem back into the 'UNI-D1' port using the same Ethernet cable. Check if you can connect to the Internet now. If YES, it looks like the problem was caused by a faulty Ethernet cable. To keep using the internet, please continue using the cable you have plugged in now. If NO, it is likely that the problem is with your nbn™ connection box. Please go to step 10.
- NO: it is likely that the problem is with your nbn™ connection box. Please go to step 10.
Can your device connect to the internet now?
STEP 8: CHECK YOUR MODEM
- Check that your modem is plugged in to a power point that is switched on and that the modem 'On/Off' button is pressed in. Is the 'Power' light green?
- YES: please go to the next item.
- NO: please go to step 10.
- Look at the lights on your modem again. Is the 'Internet' lights green?
- YES: It looks like your nbn™ connection is reaching your modem, but not your devices. Please go to the next item.
- NO: it looks like the problem is with the connection between your modem and the nbn™ connection box. Please go to step 10.
- Is your device connected via Ethernet cable or Wi-Fi?
- Ethernet:
- Connect the modem to the nbn™ connection box using a different ethernet cable.
- Connect a different device to the modem, using this Ethernet cable.
- Wi-Fi:
- If possible try connecting to the modem via Ethernet Cable, to check whether you have an issue with your modem or with your Wi-Fi connection.
- Refresh your modem connection by turning your modem off and on again, and computer/device at the same time and allowing a few minutes to start a fresh connection
If you can, please check the following:
If you can connect to the Internet now, it looks like your Ethernet cable was faulty. Please continue using the cable you have plugged in now.
If you still cannot connect, please go to the next item.
If you can connect to the Internet now, it looks like the problem is with your first device. It could be a hardware problem or the way it's configured.
If you still cannot connect, it means the internet is not working on more than one device and you have tried more than one cable. Please go to step 10.
STEP 9: RESTORE YOUR MODEM
If you have tried all the above steps it may help to restore the factory default settings.
Please note: all settings in your modem are deleted during this process.
- Press and hold the Reset button on the back of your modem for ten seconds using a sharp-pointed non-metallic object.
- You will have to wait a few minutes for the modem to reboot.
- To reconfigure your modem please refer to the 'Setting up guides' list of FAQs.
STEP 10: GIVE US A CALL
Thanks for trying to troubleshoot the problem, it looks like we'll need to investigate it further with you. Please contact us on 1300 746 754 so we can help you out.
Status Lights on Fixed Wireless nbn™ conection box
The article will explain the meaning of the status lights found on the nbn™ connection box (indoor unit) used for Fixed Wireless services.
These lights may help you quickly check on the status of your nbn™ connection which may be useful when troubleshooting nbn™ Fixed Wireless issues.
Status lights
If you have a Fixed Wireless connection, the lights on your nbn™ connection box will look like this:
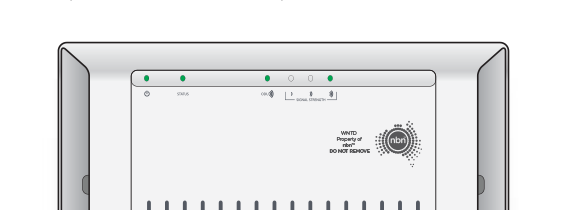
The table below tells you what the different light combinations mean:
| Light | Indicator | Meaning | Action |
|---|---|---|---|
| Power | Green | Power On | No action is required |
| Off | No Power | Check the nbn Connection Box is plugged in and switched on | |
| Status | Green Flashing | Normal Operation | No action is required |
| Green | Device in test mode | No action is required | |
| Amber Flashing | Device is starting up and installing | No action is required | |
| Red | There is a system fault | Reset the nbn Connection Box. If a reset doesn’t fix the problem, contact us on 1300 746 754 | |
| Outdoor Unit (ODU) | Green | Online | No action is required |
| Green Flashing | Activity | No action is required | |
| Red | Offline | Reset the nbn Connection Box. If a reset doesn’t fix the problem, contact us on 1300 746 754 | |
| Red Flashing | There is an error | ||
| Signal | Red | Low signal strength (no error) |
No action is required |
| Amber | Medium signal strength | No action is required | |
| Green | High signal strength | No action is required |
- Broadband
- nbn™ Plans
- Fibre Plans
- Mobile Broadband (5G)
- About Us
- Our Company
- Contact us
- Terms & Conditions
Copyright © 2026 AlphaCall Pty Ltd T/As Central Coast Internet Pty Ltd ABN: 24 615 989 154 - All rights reserved.